XStar's Libvirt+KVM部署记录
- Create: 2013-12-11
- Update: 2014-01-03
准备工作
- CPU支持检查
如果CPU支持,还需要在BIOS打开虚拟化支持。通常,主板默认关闭这个选项。
kvm-ok
# 或
grep -E "vmx|svm" /proc/cpuinfo
# Intel CPU:vmx
# AMD CPU:svm
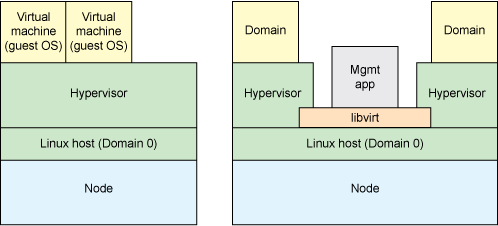
- libvirt: http://libvirt.org/
使用libvirt负责虚拟化的创建及管理。
-
网络结构
- NAT:用libvirt原有的default网络,通过virbr0连接、Dnsmasq做dhcp、iptables提供NAT;
- Bridge:手工在系统中配置网桥virbr1,在libvirt配置虚拟机直接连接该该网桥即可。
软件安装
-
相关软件包
- qemu-kvm - Full virtualization on i386 and amd64 hardware
- qemu-system - QEMU full system emulation binaries
- qemu-utils - qemu utilities
- libvirt-bin - programs for the libvirt library
- pm-utils - utilities and scripts for power management
- virt-manager - desktop application For managing virtual machines
- virt-viewer - Displaying the graphical console of a virtual machine
-
virtinst - Programs to create and clone virtual machines
- virt-install: provision new virtual machines
- virt-clone: clone existing virtual machines
- virt-image: create virtual machines from an image description
- virt-convert: convert virtual machines between formats
-
从源安装
# Ubuntu
sudo apt-get -y install qemu-kvm qemu-utils libvirt-bin pm-utils virtinst
sudo apt-get -y install virt-viewer virt-manager
# CentOS
yum install -y qemu-kvm qemu-kvm-tools libvirt libvirt-devel libvirt-client pm-utils
yum install -y virt-viewer virt-manager
-
编译安装
# Ubuntu中解依编译信赖关系
sudo apt-get build-dep qemu-kvm

tar -xzvf qemu-kvm-1.2.0.tar.gz
cd qemu-kvm-1.2.0
/configure --prefix=/usr/local/kvm
make
sudo make install

# 安装后加载KVM模块
# 注意:系统重启后要重新加载kvm内核模块,从源安装时会有qemu-kvm服务来自动加载该模块。
sudo modprobe kvm
sudo modprobe kvm-intel  #INTEL处理器就用这个
sudo modprobe kvm-amd    #AMD处理器就用这个
libvirt配置
-
/etc/default/libvirt-bin
start_libvirtd="yes"
libvirtd_opts="-d -l"
-
开启TCP侦听
-
/etc/libvirt-bin/libvir-bin.conf
listen_tls = 0           # 禁用tls
listen_tcp = 1           # 启用tcp侦听
tcp_port = "16509"       # tcp端口
listen_addr = "0.0.0.0"  # tcp侦听IP
auth_unix_ro = "none"
auth_unix_rw = "none"
auth_tcp = "sasl"        # tcp登录认证方式,"none"为不使用认证
log_level = 3
log_outputs="3:syslog:libvirtd"

max_clients = 1024        # 最大总的连接客户数1024
min_workers = 50          # libvirtd启动时,初始的工作线程数目
max_workers = 200         # 同上,最大数目
max_requests = 1000       # 最大同时支持的RPC调用,必须大于等于max_workers
max_client_requests = 200 # 每个客户端支持的最大连接数
-
安装sasl2、设置自启动
apt-get install sasl2-bin
sed -i 's/\(^START\)=.*$/\1=yes/g' /etc/default/saslauthd
-
sasl用户设置(http://libvirt.org/auth.html)
# 添加用户
saslpasswd2 -a libvirt yuanxing
#列出用户
sasldblistusers2 -f /etc/libvirt/passwd.db
# yuanxing@kvmsrv: userPassword,注意:登录时用户名要包含@kvmsrv
#删除用户
saslpasswd2 -a libvirt -d yuanxing
-
/etc/libvirt-bin/libvir-bin.conf
-
设置VNC侦听地址:/etc/libvirt/qemu.conf
sed -i -e '/^vnc_listen/d' i-e '/^vnc_password/d' /etc/libvirt/qemu.conf
echo 'vnc_listen = "0.0.0.0"' >> /etc/libvirt/qemu.conf
echo 'vnc_password = "XYZ12345"' >> /etc/libvirt/qemu.conf
-
服务管理
service libvirt-bin start|restart|stop|status|reload|force-reload
service qemu-kvm start|restart|stop|status|reload|force-reload
网络配置
软件安装
-
相关软件包
- bridge-utils - Utilities for configuring the Linux Ethernet bridge
- vde2 - Virtual Distributed Ethernet
- ifplugd - configuration daemon for ethernet devices
- uml-utilities - User-mode Linux (utility programs)(tunctl工具)
-
安装bridge工具
sudo apt-get -y install bridge-utils
使用ifplugd方便向桌面发送状态通知、通过异步处理加快启动速度(dhcp浪费时间)。
使用vde2使用可能是方便以普通用户身份来管理(UserModeLinux,涉及到uml工具)?
配置主机网络
-
配置/etc/network/interfaces
auto lo iface lo inet loopback auto virbr1 iface virbr1 inet static address 172.17.20.20 network 172.17.20.0 netmask 255.255.255.0 broadcast 172.17.20.255 gateway 172.17.20.1 dns-nameservers 8.8.8.8 4.4.4.4 bridge_ports eth0 bridge_stp on bridge_maxwait 0 -
禁用NetworkManager
sudo stop network-manager
# Create an override file for the upstart job:
echo "manual" | sudo tee /etc/init/network-manager.override
-
网桥关闭Netfilter、开启ip_forward
-
/etc/sysctl.conf
net.ipv4.ip_forward = 1
net.bridge.bridge-nf-call-ip6tables = 0
net.bridge.bridge-nf-call-iptables = 0
net.bridge.bridge-nf-call-arptables = 0
-
sysctl -p /etc/sysctl.conf - 注释: 在网桥上关闭Netfilter是出于安全考虑,具体参考:http://publib.boulder.ibm.com/infocenter/lnxinfo/v3r0m0/topic/liaai/kvmsec/kvmsecstart.htm
-
/etc/sysctl.conf
libvirt网络配置
-
NAT网络:default.xml(libvirt缺省)
<network>
  <name>default</name>
  <uuid>3be6d4fa-72c4-667b-64ae-85f954f1b2bf</uuid>
  <forward mode='nat'/>
  <bridge name='virbr0' stp='on' delay='0' />
  <mac address='52:54:00:D6:A2:9B'/>
  <ip address='192.168.122.1' netmask='255.255.255.0'>
    <dhcp>
      <range start='192.168.122.2' end='192.168.122.254' />
    </dhcp>
  </ip>
</network>
-
桥接网络:network-host-bridge.xml
<network>
  <name>network-host-bridge</name>
  <uuid>3b8bf95c-6971-8794-1c63-bc2b8c551979</uuid>
  <forward mode='bridge'/>
  <bridge name='virbr1' />
</network>
-
导入配置
virsh net-list --all
#virsh net-define default.xml
virsh net-define network-host-bridge.xml
virsh net-start network-host-bridge
virsh net-autostart network-host-bridge
# virsh net-dumpxml network-host-bridge > /etc/libvirt/qemu/network/network-host-bridge.xml
-
也可不在libvirt中设置主机网桥,配置虚拟机时,直接指向bridge,运行时传递给kvm的参数相同。
-
指向network-host-bridge
<interface type='network'> <mac address='52:54:00:6c:07:87'/> <source network='network-host-bridge'/> <target dev='vnet0'/> <model type='virtio'/> <alias name='net0'/> <address type='pci' domain='0x0000' bus='0x00' slot='0x03' function='0x0'/> </interface> -
直接指向bridge
    <interface type='bridge'>
      <mac address='52:54:00:6c:07:87'/>
      <source bridge='virbr1'/>
      <target dev='vnet0'/>
      <model type='virtio'/>
      <alias name='net0'/>
      <address type='pci' domain='0x0000' bus='0x00' slot='0x03' function='0x0'/>
    </interface>
-
指向network-host-bridge
-
libvirt生成的iptables NAT策略
# Generated by iptables-save v1.4.12 on Sat Dec 14 01:24:40 2013
*nat
:PREROUTING ACCEPT [310:34187]
:INPUT ACCEPT [41:4149]
:OUTPUT ACCEPT [471:31957]
:POSTROUTING ACCEPT [711:59731]
-A POSTROUTING -s 192.168.122.0/24 ! -d 192.168.122.0/24 -p tcp -j MASQUERADE --to-ports 1024-65535
-A POSTROUTING -s 192.168.122.0/24 ! -d 192.168.122.0/24 -p udp -j MASQUERADE --to-ports 1024-65535
-A POSTROUTING -s 192.168.122.0/24 ! -d 192.168.122.0/24 -j MASQUERADE
COMMIT
# Completed on Sat Dec 14 01:24:40 2013
# Generated by iptables-save v1.4.12 on Sat Dec 14 01:24:40 2013
*mangle
:PREROUTING ACCEPT [789078:428240757]
:INPUT ACCEPT [381196:51105050]
:FORWARD ACCEPT [407928:377150708]
:OUTPUT ACCEPT [399811:110095092]
:POSTROUTING ACCEPT [807739:487245800]
-A POSTROUTING -o virbr0 -p udp -m udp --dport 68 -j CHECKSUM --checksum-fill
COMMIT
# Completed on Sat Dec 14 01:24:40 2013
# Generated by iptables-save v1.4.12 on Sat Dec 14 01:24:40 2013
*filter
:INPUT ACCEPT [381157:51098101]
:FORWARD ACCEPT [0:0]
:OUTPUT ACCEPT [399811:110095092]
-A INPUT -i virbr0 -p udp -m udp --dport 53 -j ACCEPT
-A INPUT -i virbr0 -p tcp -m tcp --dport 53 -j ACCEPT
-A INPUT -i virbr0 -p udp -m udp --dport 67 -j ACCEPT
-A INPUT -i virbr0 -p tcp -m tcp --dport 67 -j ACCEPT
-A INPUT -i virbr1 -p udp -m udp --dport 53 -j ACCEPT
-A INPUT -i virbr1 -p tcp -m tcp --dport 53 -j ACCEPT
-A INPUT -i virbr1 -p udp -m udp --dport 67 -j ACCEPT
-A INPUT -i virbr1 -p tcp -m tcp --dport 67 -j ACCEPT
-A FORWARD -d 192.168.122.0/24 -o virbr0 -m state --state RELATED,ESTABLISHED -j ACCEPT
-A FORWARD -s 192.168.122.0/24 -i virbr0 -j ACCEPT
-A FORWARD -i virbr0 -o virbr0 -j ACCEPT
-A FORWARD -o virbr0 -j REJECT --reject-with icmp-port-unreachable
-A FORWARD -i virbr0 -j REJECT --reject-with icmp-port-unreachable
-A FORWARD -i virbr1 -o virbr1 -j ACCEPT
-A FORWARD -o virbr1 -j REJECT --reject-with icmp-port-unreachable
-A FORWARD -i virbr1 -j REJECT --reject-with icmp-port-unreachable
COMMIT
# Completed on Sat Dec 14 01:24:40 2013
-
libvirt为default网络启动的dnsmasq进程
/usr/sbin/dnsmasq \
 -u libvirt-dnsmasq \
 --strict-order \
 --bind-interfaces \
 --pid-file=/var/run/libvirt/network/default.pid \
 --conf-file= \
 --except-interface lo \
 --listen-address 192.168.122.1 \
 --dhcp-range 192.168.122.2,192.168.122.254 \
 --dhcp-leasefile=/var/lib/libvirt/dnsmasq/default.leases \
 --dhcp-lease-max=253 \
 --dhcp-no-override
常用管理操作
常用工具
virsh
virt-install
virt-manager
virt-clone
virt-convert
virt-image
qeum-img
连接libvirtd
virsh -c qemu:///system                              # 本地登录libvirt控制台
virsh -c qemu+ssh://root@172.17.20.20/system         # ssh远程登录libvirt控制台
virsh -c qemu+tcp://172.17.20.20:16509/system        # tcp远程登录libvirt控制台
virt-manager -c qemu+tcp://172.17.20.20:16509/system # 运行libvirt图形管理界面
virt-manager -c qemu+ssh://root@172.17.20.20/system
- 管理存储池
- 管理接口(bridge)
- 管理网络(Networking)
-
管理虚拟机(Domain)
- 创建/修改
- 调整内存
- 起停、悬挂、恢复
- 迁移
- console
- ttyconsole
- attach/detach
- 监控虚拟机
- Host and Hypervisor
- 管理虚拟卷
- 快照管理
- 图形界面:VNC
配置存储池
-
data.xml
<pool type='dir'> <name>data</name> <uuid>117251c7-3444-a5e3-3174-1947c4933321</uuid> <capacity>446342758400</capacity> <allocation>7004667904</allocation> <available>439338090496</available> <source> </source> <target> <path>/data/libvirt/images</path> <permissions> <mode>0700</mode> <owner>-1</owner> <group>-1</group> </permissions> </target> </pool> -
ISOs.xml
<pool type='dir'> <name>ISOs</name> <uuid>e77d9811-5497-521d-0d50-e5104c7e66b1</uuid> <capacity>446342758400</capacity> <allocation>7004667904</allocation> <available>439338090496</available> <source> </source> <target> <path>/data/ISOs</path> <permissions> <mode>0700</mode> <owner>-1</owner> <group>-1</group> </permissions> </target> </pool> -
存储池名称
virsh pool-list
Name                 State      Autostart
-----------------------------------------
data                 active     yes
ISOs                 active     yes
第一个虚拟机
使用 virt-manager -c qemu+ssh:///system 远程连接libvirtd后,在图形界面中创建了第一个虚拟机Ubuntu,并安装了操作系统。
-
Ubuntu.xml
<domain type='kvm' id='2'> <name>Ubuntu</name> <uuid>d2a37ea8-d343-c4bd-c6d0-fb6bd1943f91</uuid> <memory>1048576</memory> <currentMemory>1048576</currentMemory> <vcpu>2</vcpu> <os> <type arch='x86_64' machine='pc-1.0'>hvm</type> <boot dev='cdrom'/> <boot dev='hd'/> </os> <features> <acpi/> <apic/> <pae/> </features> <clock offset='utc'/> <on_poweroff>destroy</on_poweroff> <on_reboot>destroy</on_reboot> <on_crash>destroy</on_crash> <devices> <emulator>/usr/bin/kvm</emulator> <disk type='file' device='disk'> <driver name='qemu' type='qcow2'/> <source file='/data/libvirt/images/Ubuntu.img'/> <target dev='vda' bus='virtio'/> <alias name='virtio-disk0'/> <address type='pci' domain='0x0000' bus='0x00' slot='0x04' function='0x0'/> </disk> <disk type='file' device='cdrom'> <driver name='qemu' type='raw'/> <source file='/data/ISOs/ubuntu-12.04.3-server-amd64.iso'/> <target dev='hdc' bus='ide'/> <readonly/> <alias name='ide0-1-0'/> <address type='drive' controller='0' bus='1' unit='0'/> </disk> <controller type='ide' index='0'> <alias name='ide0'/> <address type='pci' domain='0x0000' bus='0x00' slot='0x01' function='0x1'/> </controller> <interface type='bridge'> <mac address='52:54:00:6c:07:87'/> <source bridge='virbr1'/> <target dev='vnet0'/> <model type='virtio'/> <alias name='net0'/> <address type='pci' domain='0x0000' bus='0x00' slot='0x03' function='0x0'/> </interface> <serial type='pty'> <source path='/dev/pts/1'/> <target port='0'/> <alias name='serial0'/> </serial> <console type='pty' tty='/dev/pts/1'> <source path='/dev/pts/1'/> <target type='serial' port='0'/> <alias name='serial0'/> </console> <input type='mouse' bus='ps2'/> <graphics type='vnc' port='5900' autoport='yes'/> <video> <model type='cirrus' vram='9216' heads='1'/> <alias name='video0'/> <address type='pci' domain='0x0000' bus='0x00' slot='0x02' function='0x0'/> </video> <memballoon model='virtio'> <alias name='balloon0'/> <address type='pci' domain='0x0000' bus='0x00' slot='0x05' function='0x0'/> </memballoon> </devices> <seclabel type='dynamic' model='apparmor' relabel='yes'> <label>libvirt-d2a37ea8-d343-c4bd-c6d0-fb6bd1943f91</label> <imagelabel>libvirt-d2a37ea8-d343-c4bd-c6d0-fb6bd1943f91</imagelabel> </seclabel> </domain> -
虚拟机进程
# 进程以libvirt-qemu用户身份运行
/usr/bin/kvm \
 -S \
 -M pc-1.0 \
 -enable-kvm \
 -m 1024 \
 -smp 2,sockets=2,cores=1,threads=1 \
 -name Ubuntu \
 -uuid d2a37ea8-d343-c4bd-c6d0-fb6bd1943f91 \
 -nodefconfig \
 -nodefaults \
 -chardev socket,id=charmonitor,path=/var/lib/libvirt/qemu/Ubuntu.monitor,server,nowait \
 -mon chardev=charmonitor,id=monitor,mode=control \
 -rtc base=utc \
 -no-reboot \
 -no-shutdown \
 -drive file=/data/libvirt/images/Ubuntu.img,if=none,id=drive-virtio-disk0,format=qcow2 \
 -device virtio-blk-pci,bus=pci.0,addr=0x4,drive=drive-virtio-disk0,id=virtio-disk0,bootindex=2 \
 -drive file=/data/ISOs/ubuntu-12.04.3-server-amd64.iso,if=none,media=cdrom,id=drive-ide0-1-0,readonly=on,format=raw \
 -device ide-drive,bus=ide.1,unit=0,drive=drive-ide0-1-0,id=ide0-1-0,bootindex=1 \
 -netdev tap,fd=19,id=hostnet0,vhost=on,vhostfd=20 \
 -device virtio-net-pci,netdev=hostnet0,id=net0,mac=52:54:00:6c:07:87,bus=pci.0,addr=0x3 \
 -chardev pty,id=charserial0 \
 -device isa-serial,chardev=charserial0,id=serial0 \
 -usb \
 -vnc 127.0.0.1:0 \
 -vga cirrus \
 -device virtio-balloon-pci,id=balloon0,bus=pci.0,addr=0x5
-
libvirt通过nc对外服务(自动)
sh -c if nc -q 2>&1 | grep "requires an argument" >/dev/null 2>&1; then ARG=-q0;else ARG=;fi;nc $ARG -U /var/run/libvirt/libvirt-sock
nc -q0 -U /var/run/libvirt/libvirt-sock

nc -q 0 127.0.0.1 5900
vmbuilder
使用vmbuilder创建Ubuntu JeOS虚拟服务器,包括虚拟机创建、系统安装、包安装,以及系统设置定制均可一步完成。
- 关于vmbuilder未启用磁盘的vistio特性问题: http://www.sysadminworld.com/2012/automated-installs-with-vmbuilder/
-
安装vmbuilder
apt-get instal python-vm-builder
-
使用参数
-
vmbuilder --help -
vmbuilder kvm ubuntu --help
-
- 优化设置
Vmbuilder缺省对网卡启用了virtio特性,但虚拟磁盘未启用virtio特性,可修改其配置档解决:
vim /etc/vmbuilder/libvirt/libvirtxml.tmpl

<target dev='hd$disk.devletters()' />
# to
<target dev='vd$disk.devletters()' bus='virtio' />
Since my virtual machines require a pointopoint entry in /etc/network/interfaces I also edit /etc/vmbuilder/ubuntu/interfaces.tmpl and add an additional line pointopoint underneath gateway. This will set pointopoint to the gateway address that I specify with vmbuilder.
pointopoint $gw
As a last ugly rather hack I edit /usr/share/pyshared/VMBuilder/plugins/kvm/vm.py and change the default file image type from qcow2 to raw to improve the disk throughput.
filetype = 'raw'
Instead of editing vm.py you could also use the qemu-img command after running vmbuilder to convert the qcow2 image to raw (or just keep qcow2 if you are fine with it).
- 默认模板文件:/etc/vmbuilder/libvirt/
-
自定义配置文件:MyJeOS.cfg
[DEFAULT]
arch=amd64
mem=512
cpus=2
ip=172.17.20.31
gw=172.17.20.1
mask=255.255.255.0
dns=8.8.8.8
user=yuanxing
name=YuanXing
pass=123456
tmpfs=-
firstboot=/data/libvirt/JeOStemplate/firstboot.sh
#firstlogin=/data/libvirt/JeOStemplate/firstlogin.sh
#bridge=virbr1
network=network-host-bridge

[ubuntu]
mirror=http://mirrors.163.com/ubuntu
iso=/data/ISOs/ubuntu-12.04.3-server-amd64.iso
suite=precise
flavour=virtual
hostname=JeOS
addpkg=openssh-server,acpid,vim,at,bc,byobu,tmux,screen,iptables
[kvm]
libvirt = qemu:///system
-
首次运行firstboot.sh
# This script will run the first time the virtual machine boots
# It is ran as root.

echo "Expire the user account"
passwd -e user

echo "Regenerate ssh keys"
rm -f /etc/ssh/ssh_host*key*
dpkg-reconfigure -fnoninteractive -pcritical openssh-server
-
首次登录firstlogin.sh
# This script is ran the first time a user logs in
echo "Your appliance is about to be finished to be set up."
echo "In order to do it, we'll need to ask you a few questions,"
echo "starting by setting you keyboard and other console informations."
-
分区配置:vmbuilder.partition
# ubuntu 12.04中vmbuilder的cli.py中对part的处理存在bug,不能正确按man中的格式处理设备名和文件名,因为只能使用如下简单格式
root 8000
swap 4000
---
/data 20000
vim +391 /usr/lib/python2.7/dist-packages/VMBuilder/contrib/cli.py
-
创建虚拟机
sudo vmbuilder kvm ubuntu -c MyJeOS.cfg --part vmbuilder.partition --timezone=CST -d /data/libvirt/images/JeOS

# 或者直接在命令行中指定参数
sudo vmbuilder kvm ubuntu --suite precise --flavour virtual --arch amd64 --libvirt qemu:///system \
--hostname gonzo --ip 192.0.32.9 --net 192.0.32.9 --mask 255.255.255.255 --bcast 192.0.32.9 --gw 213.103.105.1 \
--domain example.com --user john --name john --pass 12345 \
--verbose --rootsize=20480 --swapsize=2048 --mem 1024 --cpus 1 \
--addpkg=openssh-server --addpkg=vim --addpkg=acpid \
--dest=/var/lib/libvirt/images/gonzo/
virt-install
virt-install --name=Ubuntu2 --ram 1024 --vcpus=2 \
--disk pool=data,size=8,bus=virtio,format=qcow2,sparse=false,cache=writeback \
--cdrom /data/ISOs/ubuntu-12.04.3-server-amd64.iso \
--vnc --network bridge=virbr1,model=virtio --noautoconsole \
--connect=qemu:///system

# 或用网络名称:
# --network network=network-host-bridge
说明:在linux系统安装开始就要注意添加提高性能的一些参数,后面就不需要做一些调整了。
参数说明:
--name 指定虚拟机名称
--ram 分配内存大小
--vcpus 分配CPU核心数,最大与实体机CPU核心数相同
--disk 指定虚拟机镜像,size 指定分配大小单位为G。
--network 网络类型,此处用的是默认,一般用的应该是 bridge 桥接。
--cdrom 指定安装镜像iso
--vnc 启用VNC远程管理,一般安装系统都要启用。
--vncport 指定VNC 监控端口,默认端口为5900,端口不能重复。
--vnclisten 指定VNC 绑定IP,默认绑定127.0.0.1,这里改为 0.0.0.0。
--noautoconsole Don't automatically try to connect to the guest console
virt-clone
-
clone卷
virsh -c qemu:///system vol-clone --pool data tmpiEMBDQ.qcow2 JeOS_2.qcow2
-
virt-clone:虚拟机克隆
--connect=CONNECT
-o ORIGINAL_GUEST , --original=ORIGINAL_GUEST 被克隆的原始Guest名称
-m MAC , --mac=MAC MAC地址
--auto-clone, Generate a new guest name, and paths for new storage.
-n NAME , --name=NAME 新虚拟机Guest的名称
-u UUID , --uuid=UUID 指定UUID
-f DISKFILE , --file=DISKFILE
# 将JeOS克隆为指定NAME,按--file指定路径Clone虚拟磁盘。
NAME=JeOS1;
mkdir /data/libvirt/images/$NAME \
&& virt-clone \
--connect qemu:///system \
--original JeOS \
--name $NAME \
--file /data/libvirt/images/$NAME/$NAME.qcow2 \
--file /data/libvirt/images/$NAME/${NAME}_data.qcow2